About SLOH

I am 30 years old, married to a wonderful man, and finally working my way to wellness after an entire lifetime of misdiagnoses, epic diet failures, depression, and general malaise. It's a daily choice, but one I'm happy to finally be able to make, with help from a few key people in my life.

9.17.2012

Catching Up - a week of onions

Hey folks!  Sorry to leave you hanging!  I've been crazy busy the past couple weeks starting school, getting our baby registry finished and cooking up a storm!  Some successes, some not so much, but I'm here to catch you all up on the results :)

First off, as promised to all of my lovely Facebook friends, the skillet chicken chili pasta!


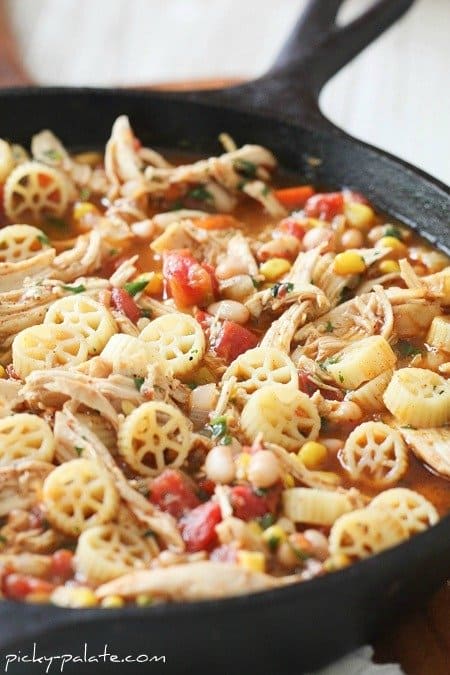
I swore I took a picture of this meal before Matt & I devoured the whole thing, but clearly I forgot (pregnancy brain).  So the above picture from the inspirational recipe (although I altered it significantly).

My final version, which Matt and I both enjoyed hot, but preferred cold:

Ingredients
  • 1 16oz bag of brown rice pasta (I used spirals)
  • 2 Tablespoons extra virgin olive oil
  • 1 chopped mayan sweet onion
  • 1 chopped red bell pepper
  • 1 diced jalapeno pepper (don't forget to wear gloves when seeding/dicing it!)
  • 1 tablespoon minced garlic
  • 2 cups cooked ground chicken *see note
  • 1 1/2 cups diced fresh tomatoes (I used both grape & on-the-vine)
  • 1 1/2 cups chicken broth
  • 1 can green chiles 
  • 1/2 cup corn (I used frozen, but you could use fresh or canned as well)
  • 1/2 cup chickpeas (I used dried that I had soaked and cooked the week before)
  • 1 Tablespoon chili powder
  • 1 Tablespoon ground cumin
  • gluten-free Ranch seasoning mix (1 packet equivalent)
  • 1/2 tsp dried cilantro
Directions
  1. Cook pasta according to package directions. Drain and run under cool water to stop cooking. Set aside.
  2. Heat oil in a deep saucepan or skillet. Add onions and peppers, cook stirring until softened about 5 minutes. Add garlic and cook stirring for 1 minute. Add chicken, tomatoes, broth, green chiles, corn, chickpeas, pasta, chili powder, cumin, Ranch seasoning and cilantro. Stir until well combined. Reduce heat to low and simmer until ready to serve, or after simmering about 20 minutes, chill and serve cold.
*note: We had some left over ground chicken that Matt had browned and seasoned with 2 small cans of tomato juice, cumin and crushed red pepper, so we used that, but you could use any cooked chicken - grilled, rotisserie, baked... whatever you have on hand.

Aside from cutting up the veggies, this was SUPER fast and easy, and because I used the whole bag of pasta instead of just 8oz as the original recipe called for, it lasted us forever, which was good because we were both really busy last week!

I also made Pumpkin Pie Granola, but due to a crockpot death in the family, this had a bit of an issue.


I used this recipe from crockpot365.blogspot.com (I only used the 1/2 c honey, and I used all raisins - no dried cranberries) - but after 2.5 hours (of the 4 required for cooking), the crockpot breathed its last & turned off, never to turn on again.  Matt ate about 1/3 of the granola before I finished it in the oven (325* for 15 minutes, stirring once and adding raisins half way through).  I haven't tried it since I finished it, and honestly, I wasn't super happy with the burning of the oats that happened in the crockpot, so I might try to adjust this recipe for just the oven (especially now that we have no crockpot).   If you don't use honey, I'm sure coconut nectar would work just as well (and honestly would probably mix better than the raw honey I used).  I'll keep you posted on the updates to this recipe as I go.

For breakfast, I made a casserole:


I was super excited about this because even though it took a long-ish time to put together, once it was done, it was crazy simple to just take out an individual slice in the morning and microwave it for 1 min on high.  I'm normally not the biggest fan of the microwave, but I've been pretty tired this week, so it was nice to not have to work hard for breakfast.

I used this recipe from thekitchn.com - but I subbed turkey bacon for the regular bacon (we're not big pork people in our house), cooked with olive oil.  I also used 3 mostly-baked white potatoes, diced with skins on, instead of the frozen ones because they put all kinds of weird additives in frozen potatoes at the grocery store.  I try to stick as close to real food as I can.  (I thought afterwards that red skinned or yukon gold potatoes probably would have been even better).  Also, I've never been a big fan of sun-dried tomatoes, so I diced 2 on-the-vine tomatoes and threw those in instead.  It was a really tasty breakfast, and like the skillet chicken pasta, was convenient for our nuts-o week.  You could easily modify this recipe to use up whatever vegetables/meats you happen to have lying around.  I feel like all of the ingredients in this were completely optional.  You could just as easily use spinach instead of potatoes, artichokes instead of peppers, leave out the bacon entirely....  Be creative and let me know what you try!

Honorable mentions this week go to:


We also enjoyed:
  • TheKitchen farmer's lunch sandwiches with onion-thyme jam - I liked this, but I bought mild cheddar for Matt, who isn't the biggest sharp fan, and I probably would have enjoyed it more with sharp.  Plus, the jam gave me heartburn. #pregnancyproblems
  • Bon Appetit curried egg salad (on rice bread instead of pitas - messy!!) - This was also fun as an experiment (especially since I used Greek yogurt instead of mayo), but I am still a bigger fan of plain ol' egg salad.  This one was yummy, but it was a little more tangy than I like normally.
  • Laylita.com baked ripe plantains with cheese - we waited a little too long to make this and our plantains were a little too ripe, which yielded bites with a bit of fermented flavor.  Probably would have been better if we'd made them sooner.  Oops.
 Up next:
  • "Use up what we have lying around the house" challenge - we're going to try to buy only eggs, milk, yogurt, butter and a few snacks this week (partially to make up for the fact that I spent twice our food budget last week in my ambition, and partially because we've had a bunch of dry/frozen ingredients sitting in our kitchen for months that need to get used!)
  • TheKitchn DIY applesauce (as part one of DIY apple butter!)
  • Healthful Pursuit frozen banana raspberry "muffins"
  • Anne-Marie Cain cinnamon apple crisps
  • TheKitchn sweet potato hash & eggs (sausage, probably not)
  • TheKitchn kale & apple soup (which Matt already made, but we haven't tried yet)
  • Glucose challenge - yes, I realize this is a medical test and not a recipe, but it's weighing heavily on my mind as a reactive hypoglycemic who is also pregnant and concerned about holistic wellness.  While I can 99% guarantee I don't have gestational diabetes (given that I've still had several blood sugar crashes recently), I still am *strongly encouraged* by my midwives to take this stupid test.  I'm not drinking Glucola - they're letting me sub fruit juice - but I'm still really nervous about the effect all of this sugar is going to have on my body and on Squirt.  I'll be sure to keep you posted about it!  My plan right now is to drink the juice (equivalent to 50g sugar!!) and if I'm feeling the sugar crash coming on within 30 mins, I'm going to just eat some protein and tell them I'm refusing the test.  If I don't feel the crash, I'll go to my appointment, have my blood drawn the hour after I drank the juice and then immediately stuff my face with enough cheese to feed a small country.  I've gotten very little support on this issue from my medical professionals, including my holistic doctor who's been treating me for the adrenal fatigue, so I'm frustrated.  But Thursday will bring an end to it all one way or another.  

To be continued....

9.05.2012

A Three-fer

I feel terrible, my dear readers!  It's been a bit hectic around here and I haven't posted anything in quite some time.  So to make up for it, I'll give you not one, not two, but THREE meal updates for the price of one - FREE! :)

First up, breakfast, since it is breakfast time right now after all.  I made this amazing omelet this morning and it is sure to stay in my repertoire for years to come!  I started with this recipe from simplylivinghealthy.org - didn't tweak much.  I made Matt's with almond butter, but I'm having an almond aversion, so I put peanut butter on mine.  We only had about 3 salvageable strawberries, so that was the topping (it ended up being plenty for both omelets!) and I only had packets of stevia in the raw, so I used half a packet in each omelet in place of the liquid stevia, and we left out the whipped cream (I've never been a fan).  You could certainly, as the original post says, substitute whatever you want in the fillings/toppings.  If you can't do bananas, I'm sure berries would be great with the nutbutter or sunbutter of your choice inside.  Or mix it up tropical style and add some mango mixed with coconut nectar on the top, and fill with berries and unsweetened flaked coconut on the inside.  Your imagination is the limit!


Of course after breakfast comes two snacks lunch! Actually, I made these for dinner first, but forgot to take a picture, so you get the photo of my lunch from hanging out with my sister doing my closet reorganization


This was super easy and delicious (both times!) - the salad is just a bagged spring mix, topped with cucumbers, green beans, carrots and fresh red bell peppers, drizzled with a little olive oil.  The meaty goodness in the middle is a Spring Leek and Lemon Chicken Patty from healthfulpursuit.com - so tasty!  I only modified two-ish things in this recipe: 1) I used 2 whole large eggs instead of 1 egg + 1/4c egg whites - I was too lazy to separate them, even with the cool trick I posted a while back.  It worked out perfectly.  2) I rarely measure spices in cooking - my husband taught me that you can't really mess up cooking like you can baking, so being super exact doesn't matter.  That said I zested an entire lemon (and a little bit of one finger - oops!), and just threw in something that looked good to me for the other spices.  That recipe yielded me 7 patties, which lasted us through several days.  It was a huge hit all around, including as leftovers - I definitely recommend trying this (and anything else Leanne posts at Healthful Pursuit - she's a genius)!

And now for my most creative endeavor since last we met - Chicken Enchiladas!!


My parents were in Aruba last week, so my sister and I split dog-sitting duties for the westies.  I went down to have dinner with my sister & brother-in-law on Wednesday night and we abused borrowed my mom's kitchen to cook these Mexican dreams, which were a special request from my brother-in-law, since the siblings' kitchen is currently being massively renovated.  Although we probably should have planned better (I didn't arrive to start cooking until 730pm, and we didn't eat until 9, even with my sister's help!), these babies were well worth the wait, especially for my sister, who added dairy back into her diet (she's been slowly adding potentially allergenic/sensitive foods back in since her elimination diet started earlier this year) just for the occasion.  

This was a HUGE experiment on a variety of levels, so I was glad it turned out so well.  I'll start with the recipe and then give you my thoughts on the first attempt, with suggestions for how to learn from my mistakes :)

Chicken Enchiladas
  • 1/4 lb queso blanco, cubed *see anecdote!
  • 1-2 cups half & half
  • 4 oz cream cheese, softened
  • 1/2 cup salsa (I used Green Mountain Gringo, medium, but I'm sure freshly made would be awesome) *see note
  • 1/2 cup sour cream
  • 2 cups chopped cooked chicken (I was lazy and bought mine at the prepared foods bar at Whole Foods!)
  • 1 cup shredded mexican cheese blend
  • 7 brown rice tortillas (I used Food for Life brand)
  • 2 tbsp olive oil, divided
Directions
  1. Preheat oven to 350* and lightly grease a 9x13 baking pan (I used olive oil).
  2. In a medium saucepan over medium heat, combine queso blanco and half & half, stirring frequently, until queso is melted and well mixed.
  3. In another saucepan over medium heat, combine cream cheese, sour cream & salsa.  Cook, stirring until melted and well mixed.  Stir in chicken and mexican cheese and set aside.
  4. In a large skillet, heat 1tbsp oil and cook each tortilla about 20 seconds on each side, until pliable.  Add remaining oil if it gets too depleted.
  5. Spread half of queso mixture on the bottom of the greased pan.  Fill each tortilla with a portion of the chicken mixture and roll up.  Place on top of queso in pan.  Top tortillas with remaining queso mixture.  Bake for 15 minutes, or until tortillas just begin to lightly brown.  Serve immediately, preferably with guacamole.
*anecdote: I had never used queso blanco before.  I tried to find a "dip" version of this pre-made because it was already so late when I was shopping, but every brand I looked at had something in it my sister and/or I couldn't eat.  So I bought a pound of queso blanco in the ethnic aisle at Wegmans and figured I'd make my own.  I cubed it to help it melt more easily (ha!) and it still took almost 90 minutes to melt enough to work!  If you try queso blanco, which is a solid cheese but delicious, I would definitely shred it finely first rather than just cubing.  You might want to sub shredded monterey jack or crumbled queso fresco (which is softer) instead, though, since I still don't know how long it would take to melt the shredded queso blanco, and I'd hate to see you wait 90 minutes for your cheese to melt!

*note: My sister has not yet added tomatoes back into her diet, so I actually took a third of the ingredients and made her her own pot of filling without the salsa.  We just added garlic and some red onion to hers with a little cumin, which she loved.  I also used a little half and half in hers to thin it out like the watery salsa did to ours.


Those are my sister's enchiladas - the BIL's and mine were a little pinker inside from the salsa.  Everyone loved them, and they were SO filling!!  We only made about 7 enchiladas, which I worried wouldn't be enough, but we even had leftovers for the next day!  I had a little extra filling of my sister's variety, so I made her a quesadilla (brown rice tortilla filled with chicken mixture, folded in half and baked at 350* for 10 minutes) to save for the next day's lunch, since she couldn't have the leftover enchiladas with salsa.  I am happy to report that my sister's dairy-trial-by-fire was a rousing success - no bad reaction whatsoever!  Hooray for her health!

My sister made the guac, and I can't remember exactly what she put in it, so I can't give you the recipe right now, but for my version, I usually use 1 avocado, juice of 1/2 a lime, cumin, 1-2 crushed garlic cloves, salt & pepper.  I know my sister used some red onion, which was a nice addition - surprising to me, because I normally hate red onion.  Maybe it's the pregnancy taste buds...  If I can find out her basic recipe, I'll post it later.

(Thanks to my sister, too, for the photos of the enchiladas!  She took them with her actual camera, as opposed to me using my phone + Instagram to make things look remotely presentable.)

The husband and I made quesadillas (no queso sauce!) later that week with the leftover ingredients.  It was WAY faster, and just as tasty.  Feel free to adapt to whatever you like/suits your time frame.

There you have it, friends.  I hope that makes up for the dreadful span of time I left you all hanging!  Happy healthy eating! :)

8.24.2012

Wins and Losses and THREE Recipes

My, oh my, do I have a lot to share with you today! :)  I really just wanted to share my wins, but I've been promising the ice cream maker story (which I count as a loss), so I figured I owed it to you.  So to start us off - my week, in wins and losses:

Wins - first good voice lesson in 3 weeks (I was suffering from laryngitis but it finally cleared up), manageably full week of work, meetings & social things, lots of kicking baby happening, a much needed visit to Dr. Reiff (toxicity, some issue with my large intestine - who knew?, histamine reaction - my hands have been swelling & itchy on our nightly walks around the neighborhood, and my usual stress reaction), [edited to add:] a super fun dinner date at Whole Foods with my awesome little sister, and one and a half delicious recipes accomplished!  so stoked about that last one.

Losses - pregnancy hormones & ailments came together in a fit of sobbing last night (which will undoubtedly bring the return of the dreaded laryngitis) over my sciatic pain on my right side, a spider greeting me with a web in the hallway right outside my bedroom door this morning (and I had no choice but to kill him :/ ), 4 pounds gained since my last visit to the midwife a month ago (which is technically only a half-loss, since that's right on track, but I was hoping to make up for the 8 pound gain from the month before - oops!), one moderately failed (although Matt doesn't agree) attempt at frozen yogurt.

Although the losses paragraph looks longer, I actually did have more wins than losses this week, so that's a good thing!

Now on to the part I know you're all waiting for anyway - the food!

We'll start with the loss, and save the absolute BEST for last.


Peanut Butter Frozen Yogurt with Carob Chips

I started with this recipe from healthyfoodforliving.com and per usual, tweaked it for my own edification.

I ended up with:

Ingredients:
  •  3 cups plain nonfat Greek yogurt *see note
  • 1/2 cup room temperature natural peanut butter*, creamy or crunchy (I used crunchy for extra texture)
  • 1/2 tsp truvia (then added another 1/2 tsp just to my bowl which helped)
  • 1 tsp pure vanilla extract (I used Trader Joe's alcohol-free version)
  • 2 big handfuls of unsweetened carob chips (from the bulk aisle at Whole Foods)
Directions:
  1. In a large bowl, combine yogurts, peanut butter, truvia, and vanilla extract. Stir until well-mixed.
  2. Two options: (I used option a.)
a) Freeze according to ice cream machine manufacturer’s instructions, folding in the carob chips after churning. Serve immediately as soft-serve, or transfer to an air-tight container in the freeze until “ripened” (hardened).
b) Fold in the carob chips. Spoon mixture into an air-tight container and place in the freezer. For soft-serve consistency, serve the frozen yogurt after about 2 hours of freezing. Otherwise, let the fro yo sit in the freezer until firm (at least 5 hours). If you are having trouble scooping the fully-frozen yogurt, let it sit at room temperature for 10 minutes before serving.

*note: I'm sure you could also use any non-dairy yogurt of your choice if you're vegan, although I haven't put that to the test.
*note: I'm assuming if you're looking at this recipe at all, you're not allergic to peanuts.  If you are, feel free to attempt it with almond or other nut/seed butter of your choice, but know that has also not been tested by me.


Three reasons this was a fail in my book, but not Matt's:

1) Our refrigerator STINKS!  Things on the top shelf of the fridge constantly freeze, but things in the freezer don't stay frozen - ice disappears & everything ends up freezer burned and horrific regardless of how it is packaged.  We left the bowl for our ice cream maker in the freezer for 2 whole days (instructions said it should be completely frozen in somewhere from 6-24 hours depending on the freezer)... When I took it out to use it, it still wasn't completely frozen, which impacted the operation of the ice cream maker :(  We ended up having to put the "frozen" yogurt in the freezer to actually freeze it.  After just 24 hours, it was a nearly-impossible-to-scoop block.  Grr.

2) 1/2 tsp was NOT an appropriate amount of sweetener for this recipe.  I'm not sure what would have been better (I'm tempted to try coconut palm sugar next time actually), so I need to experiment with that.  Adding another 1/2 tsp to my two scoops helped a bit, but I still wasn't happy because...

3) I didn't like the peanut butter - Greek yogurt combo.  I think I would have been happier with maybe the Stonyfield Farms plain yogurt for consistency/taste, although it would definitely not have the same protein punch that Greek yogurt has.  I think Greek would be fine in other recipes (fruit flavors, perhaps?) but I didn't love it with the peanut butter.

Matt has been enjoying it I think, but I haven't eaten any more since my first bowl the day after I made it. I'll experiment some more with it, and keep you posted on future developments!

Now for the highlight of my week:


I took my first bite and announced, "I'm awesome!"  (to which Matt responded, "and modest!") :)

Please, if you never try another recipe from this blog, make this for yourself!!! You won't be sorry!  (Of course, I recommend waiting until the weather is a little cooler, since my oven heated up my apartment something dreadful!)

Roasted Eggplant & Zucchini Pizza
  • 1 pizza crust (I used Against the Grain's gluten-free three cheese crust)
  • 2 cups marinara sauce (approx) - I made my own so see below for that recipe too!
  • 1 medium eggplant, cut into 1/4" slices
  • 1 small zucchini, cut into 1/4" slices
  • olive oil
  • turkey pepperoni minis (optional)
  • 1-2 cups shredded mozzarella cheese* (to taste)
  • shredded parmigiano-reggiano cheese* (to taste - I used two "sprinklings")
  • dash crushed red pepper (optional - I left it out to test my homemade sauce flavor!)
  • dash oregano (optional - same as above)
Directions:
  1. Preheat oven to 400*F.  Lightly coat veggies in olive oil and lay out on cookie sheets in a single layer.  Roast until lightly browned (about 10 minutes), then turn each piece and continue roasting until other side is also lightly browned (about 10 more minutes). [I roasted my veggies 15 mins each side as the original recipe from Cooking Light recommended, and ended up with about 1/3 completely charred!  Oops!  Adjust for whatever your oven requires and keep a close eye out!]
  2. Reduce oven temp to 375*F.  Layer crust with sauce, roasted veggies, pepperoni & cheeses, top with spices & bake 10-15 minutes until cheese is melted and crust is slightly crisp.  (I used a baking stone, but you could use a cookie sheet for soft crust or bake directly on the rack for crisp crust.)
  3. ENJOY!! I promise you will!
*note: If you're vegan/dairy-free, feel free to substitute any non-dairy cheese product of your choice.


Easy Tomato Basil Sauce (adapted from the Food Network)
  • 3 tablespoons extra-virgin olive oil
  • 3 garlic cloves, minced
  • 1 (28-ounce) can crushed tomatoes
  • Dash cinnamon (this is my favorite part!)
  • Dash nutmeg
  • Kosher salt and freshly ground black pepper
  • 10 fresh basil leaves, chopped
Directions:
  1. Coat a saucepan with 2 tablespoons of the oil and warm over medium-low heat. Add the garlic and cook, stirring, until soft. 
  2. Add the crushed tomatoes & spices. Turn the heat up slightly to medium and simmer the sauce for 10 minutes, stirring occasionally. 
  3. Stir in the basil and the remaining olive oil. 
  4. Toss with spaghetti, if desired - or use for the amazing pizza recipe above! 
I have enough sauce left over that we'll probably put it on brown rice pasta later in the week, and I'm sure it will be just as delicious! :)  Hope you all try & love this as much as I did!  My next experiment is making my own crushed tomatoes instead of using canned.  I'll keep you posted on that too!

Have a great cinnamon weekend!!

8.23.2012

Darn Cool Video

This is not my typical post, but I had to share it - coolest video ever!  This woman uses a plastic bottle to separate an egg yolk from the whites.  Genius.


I haven't forgotten my promise to tell you more about my ice cream making debut... I wasn't super happy with it, but I'm learning.  I will tell you it involved peanut butter and carob chips.  Details coming soon!

8.21.2012

Tales from Low Blood Sugar

No, I didn't cheat, I swear!  I have no idea what led to my insane blood sugar crash last night that I'm still reeling from this morning after a brown rice wrap with 2 fried eggs, 2.5 turkey bacon slices, spinach and a slice of white american cheese....  You'd think all that protein would have fixed me up, but it's now 10:45 and I still have a headache and that empty nauseated feeling.  Blech.  I didn't have any sugar yesterday, aside from a white peach, but I don't usually count fruit in the "sugar" category - natural sweet, yes, "sugar," no.  The only thing I can think is that I got really hungry at my ultrasound, which lasted over an hour because of this uncooperative little miracle, and didn't ever really catch up.  Either that, or, like my dad and my sister, somehow fish sends my blood sugar tanking within an hour...  We had baked tilapia and collard greens for dinner last night, and about an hour later, I felt cranky, sluggish and headache-y, just like when I cheat and eat ice cream.  Except without the yumminess of ice cream.  I need to look into this more.

At any rate, here is my recipe for the collards, which I thoroughly enjoy making often.  They are vegetarian, unlike most recipes for collard greens, which call for a ham bone (ick).  We're not really ham people here, so the likelihood of us having a ham bone at any given time is slim-to-none.


(side note: I neglected to take a photo of the full pan before I devoured my portion of collards - this is what was leftover after Matt & I both ate some!)


Vegetarian Collard Greens (adapted from the Food Network)

1 T olive oil
1 T butter *see note
1/4 - 1/2 large onion, diced
3 cloves garlic
dash of crushed red pepper flakes (I overdid it a bit with this one tonight!!  SPICY!)
1 lb collard greens, washed & torn into bite size pieces (I tend to throw out the thicker part of the stalks) - you could probably also use frozen chopped collards if you can find them
1-2 c vegetable stock, depending on how soup-like you want your final product
1 piece dried kombu (seaweed, optional)
salt & pepper to taste

In a large pot over medium heat, heat oil and butter. Saute the onions until slightly softened, about 2 minutes, then add the red pepper flakes and garlic, cook another minute. Add collard greens and cook another minute. Add the vegetable stock & kombu, cover and bring to a simmer. Cook until greens are tender, about 40 minutes. Remove kombu & season with salt and pepper before serving.

*note: If you are vegan/dairy-free, feel free to add another 1 T of olive oil or other cooking fat instead of butter.  It's just for flavor and doesn't matter at all.

You can also top them with chopped tomatoes at the end, but I find that it doesn't really add all that much to the recipe, especially when tomatoes aren't in season.  This recipe also stores/reheats well, so it's great if you want to add more greens to your diet but are too busy to prep them during the week.

I also experimented with our ice cream maker for the first time (no, I did not use sugar, in case you're wondering if that's the connection to my sugar crash!) - more on that later!

8.20.2012

The Pumpkin Continues

Well as you may have noticed, we didn't need an entire can of pumpkin for our pumpkin muffin extravaganza.  So, while I am late in posting this, the next morning, we "indulged" in pumpkin pancakes!! :)

I started with the recipe for South Beach Oatmeal Pancakes, and of course tweaked it based on what we had around the house (and doubled it - who wouldn't want double pancakes??)!

What resulted were delicious, albeit not so fluffy, tastes of fall! :)


Pumpkin Oatmeal Pancakes

1 c old-fashioned oatmeal
1/2 c canned pumpkin
5 eggs
2 tsp vanilla extract (it's best if you can find the alcohol free variety), approx.
1/2 tsp cinnamon, approx.
1/2 tsp nutmeg, approx.

Blend all ingredients in blender until smooth.  I find it's easiest to layer ingredients wet-dry-wet for ease of blending.  Grease a skillet or griddle (I used a cooking spray, but you could use coconut oil or butter as well) and pour batter into desired pancake size drops.  Cook first side until bubbles appear, then flip, and cook until underside is slightly brown.  Top with your choice of butter, maple syrup, honey, fruit preserves, apple butter (I just made myself want to try that!!!), or fresh fruit.  We used butter and maple syrup, which worked out nicely.

Regarding my absence this past week, I was working at a summer camp for performing arts all week and MAN, was it exhausting!!  I was NOT getting enough sleep for this growing baby, and I paid for it with horrendous food cravings (which I tragically indulged), and a return of some unfortunate symptoms.  I gained a couple of pounds, suffered with itchy scalp (which is now improving, but not gone), and just generally felt depressed and foggy.  What did I eat you ask?  I ate a blended peanut butter cup/ice cream dessert from Friendly's, and one breaded-fried calamari.  Yep, that's all it took.  Lame.  I've also been living on carbs, and while they are technically permitted on my current diet, I've been eating them too often for my blood sugar/adrenal glands, hence the weight gain.  Now I've gotta cut back and indulge in these fresh seasonal fruits & veggies before the summer is gone!!

On a more positive note, my prenatal vitamin that I've been taking has been out of stock at Whole Foods.  Why is that positive you ask?  Because we found out that the reason they are out of stock is because the manufacturer is having a shortage of the ingredients because of the mid-western drought.  I was actually thrilled to find that out because I think that's exactly what should happen to our foods/supplements.  They should be impacted by climate changes.  It made me feel so happily natural and earthy.  :)  I may have eaten ice cream, but I'm also doing something right by this kid of mine by consuming natural, whole supplements to feed his/her growing body.

And while we're on that subject, Squirt had a little growth spurt in the last 10 days.  When we went for our first, unsuccessful anatomy scan, the little one was measuring at 19w4d - a little behind where we thought we should be, but nothing to worry about.  Now today, at our second, succcessful anatomy scan, s/he measured at 21w5d - a day ahead of our calculations!  Way to grow, Squirt! :)  Can't wait to meet you in 4 months!  (Did I really just say FOUR???  Oh my....)


8.10.2012

Pumpkin Makes Everything Better

I cannot take credit for this post at all, because my husband was the brains behind the whole thing, but I wanted to share nonetheless so you can all benefit from his brilliance.

I was avoiding cleaning, and procrastinated most of the day.  But now, after 2+ hours of cleaning our apartment, it feels SO good to have it done!  Matt finished his cleaning jobs and then settled in to make salmon, kale and the reason for this post - PUMPKIN MUFFINS!

For the salmon, Matt "juiced the crap out of" 2 clementines and marinated the fish for about an hour (although admittedly it probably should have been longer, and probably with more clementine juice).  Then he topped it with lots of cumin, cinnamon, paprika, crushed red pepper flakes and salt - all to taste.  What do you want from the Italian?  :)  He says that is the order of spices from what he used most to what he used least.  Best of luck for those of you trying it out!


For the kale, which came from our friend's mom's garden about 2 weeks ago and still looks amazing, we just used a lazy garlic press to crush 2 garlic cloves, added a full skillet of kale (almost overflowing) and drizzled olive oil over the whole thing and cooked it til it wilted.

For the pumpkin muffins, we started out with this recipe from Dashing Dish, and made a couple of adjustments (not many):

2 eggs (instead of 3 egg whites - you could also use 2 tsp flaxseed meal mixed with 1/2 c water if you're vegan or egg-free)
6 packets of stevia (instead of 8-12, although the muffins were definitely NOT very sweet, so maybe 8 would be better)
no salt
random amounts of cinnamon, nutmeg & ginger (because we didn't have pumpkin spice).


The consistency of the muffins was perfect, but as I mentioned, they could have been a little sweeter... I'm thinking I might heat one up for breakfast tomorrow with a little butter and maple syrup - I'll let you know how that goes!  They also *really* stuck to the muffin cups, so I might grease those a bit next time, or try just using the tin, greased without paper cups.  As I adjust the recipe further, I'll keep you posted, but honestly, if you're in the mood for fall, these are a great use of canned pumpkin and super healthy!  Happy healthy eating!

Oh and a little spawn footage, just for fun :)


8.05.2012

Becoming a gluten-free "Italian"


Today I attempted to make my first homemade meatballs.  Ever.  I *love* meatballs, but before this whole health ordeal, I always just bought pre-made meatballs (especially turkey meatballs - yum!) at my preferred grocery store of the moment.  But now that I (obsessively) read ingredients lists, I've realized that there are absolutely NO store-bought meatballs that qualify under my new diet restrictions.  Almost all of them have some sort of sweetener or corn product, and it's inSANEly difficult to find gluten-free meatballs, even at stores like Wegmans and Whole Foods (both of which I frequent these days for their typically great selection).  So I pretty much haven't eaten a meatball since October of last year.  But since this pregnancy has made me super-meat-averse, I've been looking for ways to get a little closer to my required animal protein intake whilst fooling my incredibly picky palate.  I tend to find ground or "shaped" meats much less offensive than their whole food counterparts, so I've been living on Wegmans Gluten-Free Chicken Nuggets, eggs and dairy.


I'll occasionally attempt other meats, including poultry and fish, but it's a rare day.  Now, as you may have noticed, those chicken nuggets do contain corn products and other questionable ingredients like "Tapioca Dextrin"...  what??  Luckily, my doctor gave me the go-ahead to relax my dietary restrictions a bit while Squirt is gestating, as it's more important to eat *something* (especially something you can keep down!) than to be super rigid about the diet.  Although Matt (the husband) is not thrilled with some of those sacrifices, since I'm essentially passing on said Tapioca Dextrin to his progeny.  So I set out this week to make myself some palate-acceptable meatballs with the most whole ingredients I could muster, and I must say, it was surprisingly successful.  My inspiration came from The Family Chef, but I made some changes to suit my preferences, as any good Italian cook would (note: I am NOT Italian, but Matt is half-Sicilian, so I consider myself Italian in the kitchen by marriage).  Not to say I wouldn't change a few things about my adjusted recipe, but given that I have never made a meatball in my life, I'm pretty proud of my efforts!


We served our homemade meatballs with Tinkyada Brown Rice Spaghetti (so good!!) and Barilla Tomato & Basil Sauce (which admittedly is made with sugar, but we cannot help ourselves for the deliciousness!!) - next step is homemade sauce, which I also have never made, save for one disastrous attempt in college which resulted in a skillet-sized tomato-rock.  Details on that new experiment in the days weeks months to come....

And now the moment you've all been waiting for:

Gluten-Free Turkey Meatballs

1 lb ground turkey *see note
2 eggs
1/3 c grated parmesan cheese (I grated shredded parmesan in my mini food processor because I was too lazy to go buy grated parm.)
dash dried parsley flakes (probably about a 1/4-1/2 tsp - you could probably leave this out)
4 cloves garlic
about 10-15 fresh basil leaves (we got some from a friend's mom who grows it in her garden!)
3 sprigs worth of fresh oregano leaves (same as above!)
pinch of sea salt
3-5 twists of the black pepper grinder **see note
3/4 c milk (I ended up only using about 1/3 c)
2 c gluten-free oats (also ground in the mini food processor)

1. Grind oats in food processor or blender and set aside.  Grind cheese in a similar fashion if you were too lazy to buy grated parmesan cheese and just used the shredded cheese you had, like me, and set aside.  Grind all fresh herbs and garlic together until well chopped. 
2. Mix eggs and seasonings (cheese & herbs) with a fork or whisk and then add meat. Add half of the milk and a third of the oats. Keep mixing and adding until the correct texture is reached; you should be able to roll the meat into a ball but it should be “tacky”. ***see personal experience notes
3. Roll meatballs that are about 1 ½ inches in diameter, about the size of a golf ball.
4. Place on a greased sheet tray and if you have time, place in the fridge for 30-60 mins. This will help the meatballs set.
5. Pre-heat the oven to 375 degrees F. Bake for 20 minutes and then turn meatballs over. Bake an additional 10 minutes or until golden brown and no longer pink inside and/or 165 degrees F. 
6. After meatballs are cooked, simmer in tomato sauce.

*note: I used 99% lean free-range ground white meat turkey breast from Whole Foods.  I would probably use the fattier dark meat in the future, as this attempt was just a smidge on the dry side, but still acceptable.

**note: For the inexperienced "Italian-style" chefs out there, it's difficult to mess up spices when you're cooking.  It's not like baking.  Just toss a little in, and see what happens.  I was worried that I had *way* too much basil, but it turned out perfect.  You could use any herbs you like, and if you prefer to skip the fresh herbs, just toss in a couple shakes of some dried ones - the Italian seasoning mixes simplify this even further, putting them all in one jar!  No thinking required!

***personal experience: My molding mixture turned out a little more than "tacky" - I was covered in goo!  But given that the cooked meatballs still ended up a little dry (which as I mentioned I'm blaming on the fat content in the ground meat), I'd stick with those proportions of milk & oats next time.  I greased my tray with coconut oil which turned out pretty well.  I skipped the fridge step because my goal in the second trimester has been to exercise at least 20 mins a day, 7 days a week, so I figured I'd do my 20 min cardio dance video while the meatballs cooked.  Matt ended up having to turn them because I wasn't quite finished by the 20 min mark, but I loved the "multi-tasking" and feeling of accomplishing so much!  I knew I'd want to eat after the workout, so working out during the fridge step and *then* cooking seemed just too long to wait!  I skipped the simmering step 6 too, but it may have helped the dryness of the final product if I had done.  I'll probably try that next time, along with using the dark meat turkey.  Also, the linked tomato sauce recipe may be my jumping off point for the aforementioned sauce experiment to come. Time will tell.

And there you have it - my first (posted) recipe from my new life, and the start to a beautiful love affair with my gluten-free kitchen :)  Hope you've enjoyed starting this journey with me, and that it might bring you some healthy ideas as we travel along!

One Week Later (aka Nine Months Later)

So obviously, starting my blog didn't turn out as planned.   I had a much harder time adjusting to the miscarriage than expected, then work got in the way, and then I found myself with a whole new set of horrifically wonderful distractions.  More on that later.

I promise, I did try to write more after my long introductory post.  Here is the draft that I never came back to, and never published:

It's been a week since I started miscarrying little Bean. I'm finding it hard to do all the things I'm supposed to do. I'm in pain, and I don't really feel like eating, which is bad when you're supposed to be eating "every 2 hours of your waking day, no exceptions!" I went to pack myself food to take to work for my 8 hour day, and all I could bring myself to do was pick up an apple & throw it in my bag, unwashed. It's a shame really, because my dear husband slaved over eggplant parm & pumpkin pie this morning. He's been cooking like a fiend, as usual, but I just keep ignoring all the food in the fridge.

I wonder if I should even be back at work yet... I don't know what the typical "leave" is for miscarriage. I'm still in tons of pain, but, like a typical megalomaniac, I fear my entire program would fall apart if I weren't there, so I do my best to plug away through the pain and the sadness. I guess it's good to go back to routine in a sense, as long as I'm not pushing myself physically before I should be.

That's as far as I got.  But it sums up my life pretty well through the holiday season.  I ended up eating all sorts of cheat foods, and of course paying dearly for it.  I indulged in all the holiday cookies and breads and processed foods I came across, with self-loathing and depression leading the decision making process at every social function.  By January, my toxicity was through the roof and my autonomic nervous system was actually communicating fear - of "not finding food", of feeling guilty about food choices, of completely backsliding into all of my old habits and symptoms.  My insomnia came back, as did my irritability and digestive problems.  I just couldn't seem to dig myself out of my emotional hole.

But that month I made a decision.  I wanted a baby more than ever.  And if that was going to happen, I needed to get myself back on track and healthy to carry this new little one to the best of my ability.  And so, I began again.  I didn't eliminate anything I'd added back into my diet (which included eggs, tomatoes, and dairy - all successfully non-symptom inducing!), but I did get back to strict no gluten, sugar, processed foods, and sugar substitutes.  I occasionally still cheated with corn (which does upset my stomach a bit), soy (haven't noticed symptoms, but not actively checking either), caffeine (totally wrecks my sleep no matter what time of day) and alcohol (only occasionally, and not for a while now!) but I got a lot better about eating carefully again.  I still found it difficult to stay motivated for myself alone, which has been a wonderful topic for my therapy sessions, but I was doing a lot better than the train wreck I had been during the holidays.

Life trudged on that way for pretty much the rest of the winter and into the spring.  I found my job(s) were growing increasingly stressful and less satisfying, which made things that much harder, but minding my foods kept my emotional outbursts (mostly) in check.

Then came Easter.  Well, the week after Easter really.  I started to feel remarkably like I had when I was first pregnant with Bean.  I told Matt (my rock of a husband), but he sort of thought I was crazy, since it was so early in my cycle.  I secretly took a pregnancy test a day starting about 3 days later until I saw what was an almost imperceptible pink line.  Then I admitted my obsession and Matt made me stop and wait until a more reasonable date for testing in the interest of preserving my sanity - ha!

Low and behold, when the time finally came to "officially" test, I got a definite positive.  Two weeks later, we saw our little Squirt on his or her first ultrasound:


Squirt had a heartbeat and arm-buds!  It was so exciting, and such a relief to see our living little love.   Two weeks later, we told our families, and two weeks after that, we had our next ultrasound:


Yet another heartbeat, actual arms, and a nasal bone!  I couldn't contain my joy!  Or, it turns out, my meals.  I started with morning all-day-and-night sickness around week 8 and it didn't let up until about week 15.  Super unpleasant - I spent many a day laying down for hours because sitting up made me want to toss my cookies dry gluten-free toast.  After about 3 weeks of Matt looking down at me with a pitiful face while I sat on the bathroom floor, I began responding with, "I wanted this."  It was a good reminder that, despite the misery I was feeling, it was, in fact, exactly what I had been hoping and praying for during the previous five months.  And, as everyone was so quick to remind me, being really sick is a sign of a really healthy pregnancy, right?  ... Thanks.

In order to make a really long story a little less so, that is, in essence, what has kept me from posting since that first really long story in November.  I am now a little over 19 weeks pregnant (approaching the 5 month mark for you non-week-counters) and excitedly looking forward to our final ultrasound this coming Friday!  I'm also excited to attempt this blogging thing again as I work to regain control of my health for both me and Squirt, and as I see how pregnancy and delivery affect my body and my food relationships now that I can (pretty much) eat again.  If you've stuck around for my nine month hiatus to see what happened, I cannot thank you enough!  If you're just joining in, thanks for reading two incredibly long posts, and I promise they'll be more succinct in the future!

Here's to all of our health!